Build your own rain garden
The rainy season will be coming in a few months, and along with it comes stormwater that go eventually into our oceans. Problem lies, however, when this stormwater picks up sediments along the way, becomes polluted and badly affects our coral reefs.
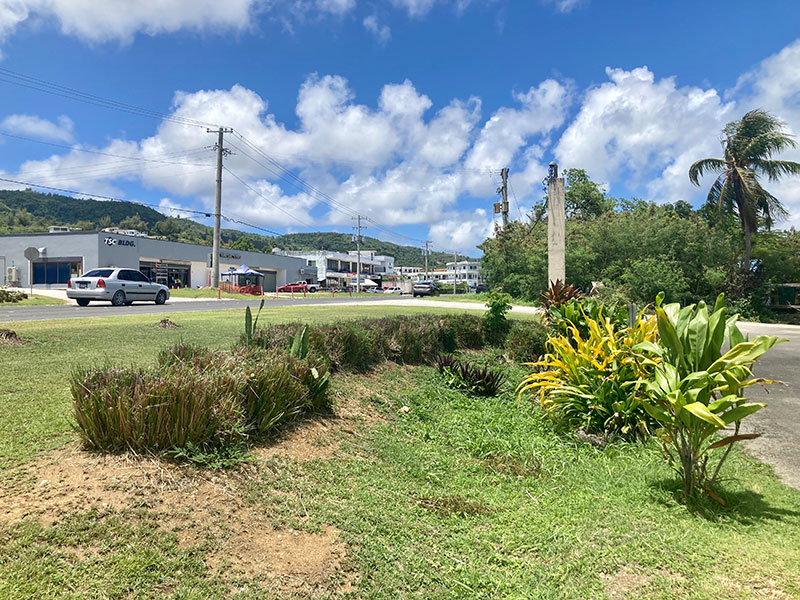
Rain gardens are “depressions” or “dips” that slow down water and help it drain and sink into the soil, addressing issues with erosion and potential flooding, and again, polluted waters that drains to our oceans, harming marine life.
There are currently four rain garden models set up by the Bureau of Environmental and Coastal Quality on island that we can all check out—there’s one at the Tanapag Middle School, one in San Vicente Elementary School, another in William S. Reyes Elementary School, and one at the NMI Museum of History and Culture.
But, it’s not just in schools or museums that rain gardens can be set up. Rain gardens can also be set up at home, and what best way to help protect our oceans from our very own yards than to do that.
Saipan Tribune sat down with Coastal Resources Management watershed coordinator Zachary Williams to talk about building a rain garden at home. He recently led a team from BECQ to restore the rain garden at the Tanapag Middle School.
According to Williams, rain gardens set ups at homes does not have to be the scale of the rain garden projects they have helped set up so far.
“It can be a smaller scale rain garden, 8 square feet is better than nothing, and it can be a pretty landscaping feature, attractive for people who like to birdwatch. It can also improve drainage on the property.”
“I know a lot of people with flooding on their property, and this is one way to alleviate a bit of that—trying to connect the rain garden to your gutter, you can have your downspouts tubing go directly in a rain garden, for example,” he added.
Setting up a rain garden does not necessarily mean spending big money too, said Williams, particularly if it is relatively small.
“Basically just dig and stabilize it with some rocks, and then plant some plants. The cool thing about rain gardens, since it collects water, the soil is a lot more moist so you can plant more wetland-like plants. Taro, for example, it thrives really well in rain gardens.”
While at the moment, Williams still hopes to have some funding opportunities for homeowners to set up their own rain gardens, anyone who wanted to know how to install one on their property may contact him for technical guidance and advice.
To learn more about rain gardens, contact Zachary Williams at zwilliams@dcrm.gov.mp or visit the CRM website at https://dcrm.gov.mp.
How to build your rain garden
Source: CNMI Rain Gardens: A Rain Garden Manual for CNMI Residents, printed with permission from BECQ
Step 1: Pick a location. Choose a location where water sits, but typically dries up within 24 hours after a storm. A simple way to test this is to do a soil test. For the soil test, dig a hole that is 12 in. deep and 6 in. diameter, then fill it with water. Wait for it to drain, and then fill it again. If it drains within 12-24 hours, then your soil is good. If it takes longer than 24 hours to drain, you will need to mix your soil with sand and compost to achieve better drainage before you add your plants.
You also have to make sure you have a way for your water to get in and a way for your water to get out. Choose Areas at least 10ft away from any building, without utilities or pipes, at least 3ft away from big trees and their roots without steep slopes or hard bedrock, or away from your septic tank or leach field.
Step 2: Get the water in. Make sure there is a way for water to go into your garden. The easiest inlets are a rooftop downspout, driveway or culvert that directs stormwater into the depression. You may have to dig a trench, redirect your downspout or cut back grass to make sure the water easily flows in during a storm. Estimate how much water is coming in by measuring the area of hard surfaces in the drainage area, like the roof or driveway, that flows directly to the site where you want your garden.
Step 3: Dig. You want your garden to catch water and act like a mini pond. Your garden should ‘dip,’ or have a depression. Dig around 6”-8” deep for the deepest part of your rain garden (usually in the middle). Then the sides gradually slope up until at least the upstream side is level with the surface. A hump or “berm” on the opposite side from the inlet holds the water in, but allows water to overflow in really big storm events.
Step 4: Choose plants. You want a mixture of plants that can handle Saipan weather patterns and seasonal changes. Look for a mix of shrubs, flowers, grasses, and small trees. Native plants usually do the best in local weather conditions.
Depending on the shape and depth of your rain garden, you will find some spots are wetter and require plants that can handle flooding, like taro. Other spots will usually stay drier and need drought-resistant plants like vetiver grass. Pay attention to sunny and shady spots too to figure out where to place different plants. Plants that work well in the CNMI rain gardens include vetiver, taro, red ginger, and ti.
Step 5: Maintenance. Pay special attention to your garden for the first couple of months following the digging and planting. During the dry season, water your plants as needed and keep an eye out for dying plants. Use additional plants to fill in bare areas throughout the first 6-12 months. Make sure to weed your garden at least once a week. Do not use pesticides or fertilizers on your garden, as they are chemicals and harmful to our environment.
If you notice that your inlets and outlets (areas where your water comes in and out) are filled debris, clear them out. If they are blocked by soil, remove the soil and mix it with mulch or compost and re-layer your garden. Look out for debris after every big rain event.